How to run Rust on Arduino Uno - Our first blink 💡
19th August 2020
creativcoder / 9min

At the time of writing this, about a month ago, the rust-avr fork was merged upstream. This means that you can now compile Rust programs for the avr microcontroller board by just running cargo +nightly build, providing a .cargo/config.toml for your target (avr-unknown-unknown). That's huge!
I have always been fascinated with the idea of using code to manipulate and affect physical objects. This is probably going to be a series of blog posts on my adventures with Rust on Arduino and maybe ESP8266 and discovery F3 in future. (I have these lying around too). Kicking off the series with this first post.
Target audience: This post is written with beginner to intermediate folks in mind who want a head start with embedded systems in Rust with Arduino. Once you have gone through this post, you may wanna go through the through the basics on embedded rust book. The code in the post is compiled on a Linux machine (Arch linux) with Rust compiler version: rustc 1.47.0-nightly (22ee68dc5 2020-08-05).
We'll take a whirlwind tour on how to run Rust on the Arduino Uno, which is probably the most widely known and used development board in the hobbyist embedded domain. The Arduino Uno is based on the ATmega328P, which is an 8 bit microcontroller falling under the family AVR. AVR is a family of micro-controllers developed since 1996 by Atmel, which was later acquired by Microchip technology. If you wanna read more about that, head over here: AVR-Rust book
With that brief history aside, let's get into it!
We'll do the hello world of arduino which is blinking its built-in LED. It's a very simple exercise, but there's a lot to learn as a beginner.
Setting up our project
First, we'll create a new cargo project by running:
cargo new rust-arduino-blink
We'll need to cross compile our project for the avr target (target triple:avr-unknown-unknown).
For this we'll need to switch to the nightly toolchain as some of the dependent crates use unstable features to make all of this happen. So we'll run:
rustup override set nightly
The above command overrides the toolchain of choice for only our current directory to be nightly.
Then we'll install the required packages:
pacman -S avr-gcc
The avr-gcc package is required to use the linker.
pacman -S arduino-avr-core
The arduino-avr-core package contains utilities such as avrdude which is a tool to upload and manipulate ROM and EEPROM contents of microcontrollers using the in-system programming technique.
I am on an arch linux distro (endeavour OS) where pacman is our package manager.
Then, under Cargo.toml we'll add the following dependencies:
[dependencies]
# A panic handler is needed.  This is a crate with the most basic one.
panic-halt = "0.2.0"

[dependencies.arduino-uno]
git = "https://github.com/Rahix/avr-hal"
avr-hal is a cargo workspace that contains a bunch of crates segregated by boards where the arduino-uno crate is one
of them. Thanks to Rahix for putting this together.
We'll also need to add build metadata for cargo for the avr target. We'll create a file avr-atmega328p.json in our project root with the following contents:
{
    "llvm-target": "avr-unknown-unknown",
    "cpu": "atmega328p",
    "target-endian": "little",
    "target-pointer-width": "16",
    "target-c-int-width": "16",
    "os": "unknown",
    "target-env": "",
    "target-vendor": "unknown",
    "arch": "avr",
    "data-layout": "e-P1-p:16:8-i8:8-i16:8-i32:8-i64:8-f32:8-f64:8-n8-a:8",

    "executables": true,

    "linker": "avr-gcc",
    "linker-flavor": "gcc",
    "pre-link-args": {
      "gcc": ["-Os", "-mmcu=atmega328p"]
    },
    "exe-suffix": ".elf",
    "post-link-args": {
      "gcc": ["-Wl,--gc-sections"]
    },

    "singlethread": false,
    "no-builtins": false,

    "no-default-libraries": false,

    "eh-frame-header": false
  }
and reference it in .cargo/config.toml:
[build]
target = "avr-atmega328p.json"

[unstable]
build-std = ["core"]
With that, our build configuration is complete.
Let's write some code
With the dependencies aside, let's add code under main.rs and go through it incrementally:
(Quick tip: You can run cargo doc --open in your directory and have a documentation of this project along with its dependencies for ready reference)
// main.rs

#![no_std]
#![no_main]
First we need to specify a few global attributes to let the compiler know that we are in a different environment.
We are in an embedded environment which doesn't have functionalities that the standard library crate of Rust depends on such as heap allocation APIs, threads, network APIs etc. So we need to add the #[no_std] attribute at the top. We also need to override the default entry point (fn main()) using #[no_main] because we are going to be providing and defining our own entry point to the program. To define our entry point, we'll use the entry attribute macro from the arduino_uno crate to define a custom entry point. Usually the board crate you use will provide an entry macro to you.
We then add use statements to bring the required items in scope from the dependant crates.
extern crate panic_halt;
use arduino_uno::prelude::*;
use arduino_uno::hal::port::portb::PB5;
use arduino_uno::hal::port::mode::Output;
Notice the panic_halt crate? We need a panic handler because:
In the standard library panicking has a defined behavior: it unwinds the stack of the panicking thread, unless the user opted for aborting the program on panics. In programs without standard library, however, the panicking behavior is left undefined. A behavior can be chosen by declaring a #[panic_handler] function. Source: [embedded rust book]
Let's move on:
#[arduino_uno::entry]
fn main() -> ! {

}
Then we have our main function annotated with the entry attribute macro from the arduino_uno crate. The ! is
the never type which denotes that the function never returns.
To blink the LED, we only need a few lines of code and set the relevant pin high or low. Let's take a look at the pin diagram of the ATmega328P chip on Uno:
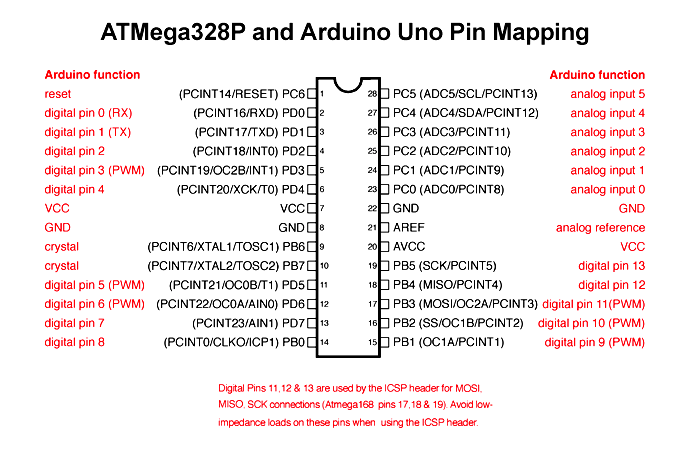
In the diagram above, you can notice various pins on the microcontroller. Most microcontrollers, if not all, contain pins that allow the device to both read and write digital values to external circuits. Some of them are categorized as I/O ports. A port is a group of pins representing a standard interface. These ports are controlled by port registers, which can be thought of as a special byte variable that we can change in our code.
In case of ATmega328P, we have three port registers to work with:
- C – for analogue pins 0 to 5
- D – for digital pins 0 to 7
- B – for digital pins 8 to 13
The details are explained better here: Port Manipulation
If you look at the Uno, we have the digital Pin 13 which is connected to the built-in LED. We need access to the pin in our code in order to manipulate the LED, i.e., set it high or low.
Let's add more code:
#[arduino_uno::entry]
fn main() -> ! {
    let peripherals = arduino_uno::Peripherals::take().unwrap();

    let mut pins = arduino_uno::Pins::new(
        peripherals.PORTB,
        peripherals.PORTC,
        peripherals.PORTD,
    );

    let mut led = pins.d13.into_output(&mut pins.ddr);

    loop {
        stutter_blink(&mut led, 25);
    }
}
There's a lot going on in the code above!
First, we create an instance of Peripherals which is a list of all peripherals in Uno.
Peripherals are devices that bridge the communication with your chip/cpu with external devices, sensors etc.
Examples of peripherals would be your timers, counters, serial port etc.
An embedded processor interacts with a peripheral device through a set of control and status registers.
We then create a new Pin instance passing in the ports from the peripheral instance peripherals.
We then define a variable led that will hold the pin number that the LED is connected to. This is created by configuring pin 13 as output pin using the into_output method of the d13 pin and passing in a mutable reference to our ddr register.
DDR register determines if pins on a specific port are inputs or outputs. The DDR register is 8 bits long and each bit corresponds to a pin on that I/O port. For example, the first bit (bit 0) of DDRB will determine if PB0 is an input or output, while the last bit (bit 7) will determine if PB7 is an input or output. I still need to do a bit more reading to fully understand DDR registers.
Next, we go into a loop {} and call stutter_blink function providing a mutable reference to our led instance
and number of times (25) that we want to blink.
Here's our stutter_blink function definition:
fn stutter_blink(led: &mut PB5<Output>, times: usize) {
    (0..times).map(|i| i * 10).for_each(|i| {
        led.toggle().void_unwrap();
        arduino_uno::delay_ms(i as u16);
    });
}
All we do in stutter_blink is call toggle on led followed by a delay_ms call from the arduino_uno module.
This is all done in an iterator. We create a range (0..times) followed by calling map so that we can progressively delay the LED toggle by a noticeable amount. We could have definitely done this using a for loop and that would be more readable, but I wanted to demonstrate that we can use all the high level APIs and abstractions from Rust.
We are writing functional code for an embedded systems where the abstractions are zero cost.
That's a thing possible only in Rust as far as I know!
Here's the full code:
// main.rs

#![no_std]
#![no_main]

extern crate panic_halt;
use arduino_uno::prelude::*;
use arduino_uno::hal::port::portb::PB5;
use arduino_uno::hal::port::mode::Output;

fn stutter_blink(led: &mut PB5<Output>, times: usize) {
    (0..times).map(|i| i * 10).for_each(|i| {
        led.toggle().void_unwrap();
        arduino_uno::delay_ms(i as u16);
    });
}

#[arduino_uno::entry]
fn main() -> ! {
    let peripherals = arduino_uno::Peripherals::take().unwrap();

    let mut pins = arduino_uno::Pins::new(
        peripherals.PORTB,
        peripherals.PORTC,
        peripherals.PORTD,
    );

    let mut led = pins.d13.into_output(&mut pins.ddr);

    loop {
        stutter_blink(&mut led, 25);
    }
}
Let's try to build this crate:
cargo build
If all went fine, you should see an elf file rust-arduino-blink.elf generated under target/avr-atmega328p/debug/ directory. That's the binary we need to flash to our Uno. To flash the elf file, we'll use the avrdude utility. Let's create a script at the root directory named flash.sh that does cargo build followed by flashing it our uno:
#! /usr/bin/zsh

set -e

if [ "$1" = "--help" ] || [ "$1" = "-h" ]; then
    echo "usage: $0 <path-to-binary.elf>" >&2
    exit 1
fi

if [ "$#" -lt 1 ]; then
    echo "$0: Expecting a .elf file" >&2
    exit 1
fi

sudo -u creativcoder cargo build
avrdude -q -C/etc/avrdude.conf -patmega328p -carduino -P/dev/ttyACM0 -D "-Uflash:w:$1:e"
With that, we can now run (make sure your Uno is connected via the USB cable):
./flash.sh target/avr-atmega328p/debug/rust-arduino-blink.elf
and there you go:
Our first blinking program on Arduino running Rust!
If you get a permission denied error when accessing /dev/ttyACM0. You may need to add your user
to a linux user group that has access to the serial interface.
First, we find the group using:
ls -l /dev/ttyACM0
I get the following output on my machine:
crw-rw---- 1 root uucp 166, 0 Aug 19 03:29 /dev/ttyACM0
To add your username to uucp group, we run:
sudo usermod -a -G uucp creativcoder
Suggestions/comments/corrections most welcome.
I have several embedded hobby projects in plan, I will be writing about them in future as they progress. Here's the Github for the code above. If you want to follow the latest in developement in Rust embedded space, follow the embedded rust working group
Until next time!
Want to share feedback, or discuss further ideas? Feel free to leave a comment here! Please follow Rust's code of conduct. This comment thread directly maps to a discussion on GitHub, so you can also comment there if you prefer.